Harley Davidson started equipping models with the CV carburetor in 1989 and has utilized the same carb ever since. A CV carburetor (Constant Velocity) incorporates a vacuum operated slide that varies the venturi size within the carburetor, thus maintaining a constant velocity. The slide also holds a needle that when lifted by the opening slide varies the amount of atomized fuel delivered. This ingenious design is believed to have been developed by racers who altered British made carburetors and was eventually put into production by Keihin. Modifications to this reliable carb continue today in the form of race tuner kits, hybrid slides, and
Stage 1 Kits .
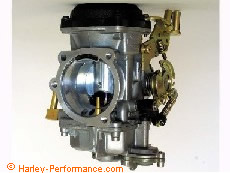
Due to the CV carburetor’s stable metering characteristics, Harley then commissioned their own version to replace the aging butterfly style carburetors. The stock CV carburetor when properly tuned delivers more than adequate performance to any stock or slightly modified Harley while still maintaining good gas mileage.
A Harley CV carburetor by far outperforms it’s butterfly style predecessors, namely the Keihin, Zenith, and Bendix. This brings us to the subject of upgrading these older Harley “Soup Cans” to the newer CV style carb. Harley Davidson motorcycles prior to 1989 used a standard butterfly carburetor and are excellent candidates for upgrading to the newer CV carburetor. The upgrade is quite straight forward and for the majority of models only requires a
Flange Adapter be fitted between the carb and the manifold.
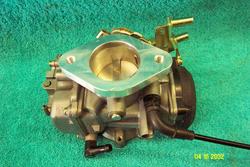
Pre-1989 Harley’s used a two bolt flanged manifold, whereas a CV carburetor simply slips onto a rubber boot and is held in place by the air cleaner’s backing plate. Total conversion shouldn’t cost more than 200 bucks… less if you can find a buddy with a spare CV carb in good condition.
A CV carb also requires the use of a dual throttle cable system where one cable operates the throttle (open) action and the other cable functions as the idle action in closing the same throttle. Mid to pre 70?s bikes used a single throttle cable configuration which should be upgraded. Though many have used the CV carb using a single cable the chance of the throttle not closing due to the cable binding makes this a risk not worth taking. If requiring an upgrade to a dual cable system there are several sources to do so including the dealer or
online.
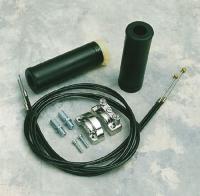
Parts required to complete the CV carburetor upgrade:
The carburetor for the conversion should be in known working condition (if used) and include a enricher (choke) cable. The choke utilized on a butterfly carburetor is different and therefore won’t work for this conversion.
Step 1 – Unbolt the old carburetor from the manifold. Disconnect the fuel line and vacuum hoses. If the original dual cable setup is to be reused label them for reinstalling on the CV carburetor.
Step 2 – Loosely place the flange adapter on the carb and align with the manifold bolts. Mark where the adapter should be permanently aligned on the carb so that the carburetor is horizontally level. If using the press fit type of adapter a small amount of JB Weld should be applied to the adapter to affix to the carb. Press the adapter onto the carb and allow the adhesive to cure.
Step 3 – Attach the throttle cables to the carburetor. If upgrading from a single to double cable system this should be completed prior to this step. Attach the new choke (enricher) cable to the carb body.
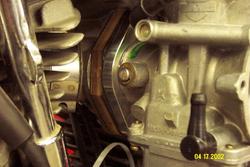
Step 4 – Attach the fuel line with a new clamp. Connect the vacuum line from the VOES to the top-rear inlet. If the carb is equipped with a overflow coming from the bottom of the bowl (this is NOT a vacuum port), direct a piece of vacuum hose down between the cylinders toward the bottom of the frame. Some prefer to plug this tube instead.
Step 5 – Pass the choke cable in between the cylinders and locate a mounting place on the left side of the engine to hold the choke knob. This may require a fabricated bracket or using one from a newer model Harley. Mount the CV carb to your current manifold using a new stock gasket. Recheck all hose connections and make sure the throttle operates smoothly without binding. Adjust the throttle cables as needed.
Step 6 – If using an aftermarket or S.E. air cleaner attach to the carb along with the breather bolts to each head. When using your stock air cleaner assembly it may require the holes on the backing plate to be re drilled in order to align with the three holes on the face of the carb.
Step 7 – Turn on the fuel petcock, engage the choke and start the engine. This may take a moment since the fuel bowl is empty. Adjust the idle and follow the tips under
Harley CV Carburetor Tuning to get your bike fine tuned.
Congratulations, you’ve just upgraded your carburetor! Not only will you benefit from the same performance and reliability as newer Harley’s, but think of how much you saved compared to the cost of a high-priced “super” carburetor kit.
Enjoy the Ride!


